Introduction:
The HTMLPublisher is a powerful tool in QualiWare for configuration of the web side of the tool. Through the publisher template, everything that is viewed on the web is generated and customized. Using the publisher and its associated HTML templates you can customize the looks of dashboards, menus, diagram pages, and configure roles to allow the people who need to see certain pages.
HTML Overview:
The publisher uses several templates in order to generate what we see on the web. These templates can be viewed in the repository explorer by clicking the HTML button in the lower left corner to filter templates.


The HTMLPublisher is the main template through which all the other templates will work. There is one per repository.
![]()
The HTMLPublisher
- Double click the HTMLPublisher template to open it, or open it from the toolbar


- The above image is the main page of the HTMLPublisher.
1. The default men – The menu that will appear on the left-hand side of the webpage
2. The configurations – The various configuration/private workspaces that will be published
3. The language variants that will be published.
4. The options we can choose to publish when we run the publisher (Check Diagrams if you want to publish/republish the diagrams, Check languages if you want to publish languages, etc.) Note: once all diagrams have been published (for example) they don’t need to be checked if you don’t want to publish them again.
5. The ISS Application – This is generated on repository setup and will not be edited. It determines the address of the website. - If you choose to check ‘Publish Diagrams’ you will get the option to choose all diagrams or a subset. Press CTRL+A to select all diagrams if you wish to publish them all.


- The view button on the Publisher will take you to your organizations home page
Publishing a Single Diagram
- If you are working on a diagram you have the option to publish just that diagram and no others without accessing the Publisher
- When viewing a diagram in QLM, select the HTML button and choose Publish

- This menu also gives us the option to view the diagram directly on the web once it is published

The MegaMenu
- On the publisher, press the + button next to the Default Menu setting. This will open the Megamenu

- This diagram represents the left-hand menu on the web in a tiered fashion.


- Each of these tiles (MegaMenuItem) is configurable and can link to a web page, an object, or a diagram

1. Here we can link objects and diagrams to the tile
2. Here we can type in a web address to create a link
3. Here we can change the menu image of the top-level tile, using built-in or custom images.
4. Here we can select roles by right-clicking. This will change and limit who can view the menu item based on who has the appropriate role(s)
Note: The MegaMenu is restricted to 3 tiers, any objects put in a 4th tier will not appear on the web.
HTMLTemplateDefinitions
- HTMLTemplateDefinitions define what is shown on a page when viewing an object on the web. There is one HTMLTemplateDefinition for most objects (missing ones can be added)


- The HTMLTemplateDefinition will define the tabs at the top of the diagram/object, the information displayed in the left highlighted area, and it is possible to add info on the right-hand side of the diagram as well.

1. Choose the template for the definition here.
2. Right-click and press insert specific objects from the chosen template. If this is left blank the TemplateDefinition will cover all of the objects of that template.
3. Right-click in this space and click ’Add Standard Navigation Buttons’ to add buttons to the top of the web page.
4. Right-clicking in this space allows you to add ReportDefinitions if required.
- Check Inherit Standard Content Tabs to display the listed tabs. They will appear at the top of the diagram/objects.
- Checking this box will allow the Rasci tab to display a standard RASCI
- This section allows you to right-click and insert HTML features that appear as buttons over the diagram. If the Use Workflow Engine button is checked, these buttons will be generated based on the governance state. An example is this edit button on the upper right of the diagram:


1. This attribute allows you to hide or make visible the left-side information
2. Right-clicking in this space allows you to insert HTMLContentBoxes into the left side. A content box contains information about the attributes of the diagram or object: Viewed on the web:


1. The center tab is where we set up the tabs that will be visible along the top of the diagram/object on the web.
2. Right-click in either box and click Insert to choose what content you want to have visible. This will be in addition to the standard content tabs added on the “additional” tab picture
The above tabs viewed on the web: ![]()

1. The “Right” tab is where we can set up what content is seen on the right-hand side of the diagram.
2. Right-click in the box and insert to choose the object you want in this section
3. Visibility can be turned on or off depending on how you want the content to be viewable
In the above template only 1 content box will be visible on the web due to the role settings: 

1. The ‘Analytics’ tab allows customization for what can be viewed on a diagram’s analytics page
2. Right-click and select Insert and choose the objects you want displayed here.
3. To access the web, when viewing a diagram press the Analytics button at the top of the screen:

4. The tabs at the top of the screen will reflect the content in the Analytics tab ![]()

1. Target determines what happens when clicking on a link to a diagram. Self will open up the diagram page in the window, New Window will open up the page in a new window, IFrame will open the diagram in a small frame in the window, and FancyBox will open it in a box.
2. Right-click and select Add Attribute to choose what attributes you want visible in the Iframe/Fancybox.
3. Right-click and insert to choose tabs that can be accessible from the Iframe. By default, it is the same as the ‘Center’ tab.
HTMLContentTabs and HTMLContentBoxs
HTMLContentTabs and Boxes are used in many of the above steps to display information on the web. This section will provide an overview of these two templates.
HTMLContentTab 
The HTMLContentTab is a fairly simple template with 2 main options for customization.
Title: This is what the name of the Tab will appear as on the web.- Title: This is what the name of the Tab will appear as on the web.
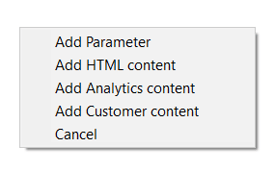
The option to focus on is Add Parameter, which will give us a list of templates to choose from. Choose the template you want and it will give you a list of attributes you can choose to display in the list. The above image has only HTMLDrawing, which will display an image of the diagram in the tab.
You can choose HTMLContent or Analytics to add business charts or Content boxes if required. Customer content adds a customizable prompt.
Ex.
BusinessProcess Template definition out of the box has an HTMLContentTable: ![]()
The content table populates attributes in the highlighted areas:  How it appears on the web:

HTMLContentBox
Similar to the HTMLContentTab, the HTMLContentBox displays information based on an object and the attributes/info you request. A content box can also display statistics in a Chart. 
- The settings here determine how the box looks when the object is opened. You can choose whether or not it is collapsible, whether it not it is collapsed when the object is opened, and whether or not the box is there if there is no info.
- Right-click in this space, and we can add parameters, analytics, and HTML content, similar to the HTMLContentTab.
- The title is what will appear at the top of the box when viewed on the web.
Ex.
When viewed on the web:
We can see that it reflects the attributes set in the template and it is not collapsible.
HTMLDesktop
The HTMLDesktop is the first window you see when accessing your repository through the web. It is made up of a series of tiles and tabs linking to other desktops. 
These can be edited in the HTMLPublisher on the “PersonalPage”. 
- Double click the “My Desktop” HTMLDesktop to view the tiles that make up the above page

- The Desktop title is what appears on the tab at the top of the screen on the web.
- Right-click in an empty space in the tiles section and select Insert to see a list of tiles you can place on the page. Right-clicking also allows you to set a role filter to limit who can see certain tiles
Double-click on a tile to open it 
1. This is the title of the Tile as it appears on the web.
2. This allows you to set the color of the tile. It is blank by default and appears as white on the web.
3. Here you can select from a preset selection of icons to appear on the web. If it links to a diagram you can select “Show Diagram” to show it on the tile in place of an icon.
4. Here you can set the size of the icon.
5. Here you can set custom text that will appear on the tile if there is no diagram to display
6. Clicking the plus symbol next to “Link” will allow you to choose any object in the repository to link to the tile. This can be a diagram, a BusinessChart, a QRV/Spreadsheet, or any other object you may want.
7. The “Method” set contains several premade methods that will populate a list of objects, such as objects you are subscribed to, objects you are responsible for, etc. that will then display a count on the web such as:


The above lists objects that I am responsible for that are in various states of governance. This is an out-of-the-box tile that everyone has access to.
HTMLQueryResultView
The HTMLQueryResultView or QRV is a standard template used to generate a list on the web. The result will look something like this:

These can be linked in the megamenu or on a Tile on the desktop.
- To create a QRV, right-click on the HTMLQueryResultView template in the repository explorer and select new
- Navigate to Explorer. On this page under Button, you can right-click and Add Standard Buttons to get a list of buttons you can add to the QRV
- In the space below you will define your columns, right-click, and select Add column. On the line that appears there will be the word “attribute” Double-click this and select template attribute. Navigate to your desired template, you will get a list of attributes, from here you choose the desired attributes you want to be displayed. These are your columns.
- For Example:

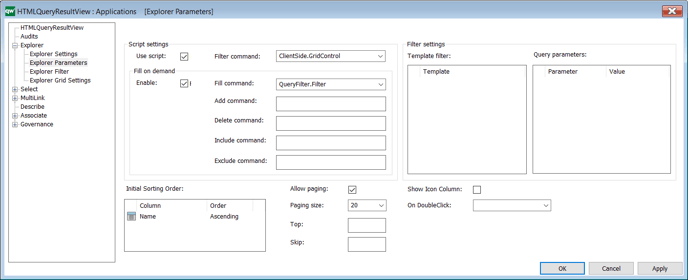
- Navigate to Explorer Parameters. Here you can set filters, the sort order of objects, and how many objects appear on a page.
- Navigate to Explorer Filter. Here you will have to fill out a row filter. It can be as simple as “Template=’Activity’” and this will cause the QRV to search out activities and nothing else.
- In the column filter right click and it will give you options reflecting the columns from the Explorer Setting. Select them all.

- For a basic QRV we don’t need to touch Explorer Grid Settings.
- Click apply, publish your QRV, then select view on the HTMLPublisher.

- The web will return your information with the columns and filters you have chosen.
Spreadsheets
Spreadsheets are a means of creating editable content on the web for a large number of objects at once. They work in the same way as an Excel spreadsheet. 
- To create a spreadsheet we need to use a GenericQuery to pull our information. (Info on how to create a Generic Query is available in the BusinessCharts document.)
- The above example spreadsheet is an out-of-the-box spreadsheet in QualiWare. It is using the below GenericQuery to generate its columns:

- To achieve this, open a new spreadsheet in the repository explorer by right-clicking on Spreadsheet and selecting new.
Navigate to the settings tab and under ExternalDataSource find your GenericQuery. Once you have it selected, press build. 
- This will automatically build your spreadsheet parameters, as well as the column rules and column filters on the “Rules” and “Filters” tabs.
- Click apply to save, close, and publish the spreadsheet. You can now click view on the publisher to view it, and it can be linked to a megamenu item or a tile, as required.
Dialog Layouts
The ability to edit an individual object on the web, or create an object, exists, and there is a template that controls how this is managed called the HTMLDialogLayout. If no HTMLDialogLayout is created for a template, it will use a default layout. Below is a comparison of how the dialog layout looks in QLM vs. how it looks on the web.
The CorrectiveAction template’s HTMLDialogLayout in QLM:

CorrectiveAction edit dialog reflected on the web: 
We can see that the HTMLDialogLayout is reflected on the edit page on the web, and the “SubDialogs” (visible on the right side of the diagram) are the tabs that we see on the web.
These Dialogs are fully editable like any diagram to add or remove attributes you want/don’t want on the web.
Default Context Menu
On the main tab of the HTML publisher, there is a “Default Context Menu” option. This will not be edited often but it is important to know what it does. ![]()
- Click the plus sign next to the box.
- This opens the Context Menu in QLM

- On the web, the effects of this can be seen from the Repository Explorer

- This opens the web equivalent of the repository explorer in QLM

- Next to an object select the 3 dot button that appears when hovering over the object

- The menu that pops up from this button is what is meant by the context menu
